Hi DCMQG! My name is Lorraine Robidoux and I am a relatively new member of the DC Modern Quilt Guild. I volunteered to write this month’s blog post about Quilt Math. Yes, you read that right -- Quilt Math.
Some of you likely just did an involuntary shudder, while some of you got excited...others are Quilt-Math-impartial!
First and foremost, when I say that I am writing a blog post about Quilt Math, what do I mean? Generally speaking, quilt math could mean many things. Most things that we do related to quilting involve measuring, cutting, and piecing. Even in improv quilts -- you’re measuring with your eye and your artistic intuition instead of a ruler. For the purposes of this blog post, when I talk about Quilt Math, I am referring specifically to the math required to scale a quilt block up (i.e. make it larger) or down (i.e. make it smaller).
Quilt Math, like any math, can be intimidating. But I’m here to say that if you have a desire to learn, the patience to work through it, and access to the basic steps, that anyone can practice Quilt Math successfully. Once you master the basics, you will have the ability to scale every part of your quilt adventure -- from individual quilt blocks and the pieces within to a whole project design based on your own measurements/requirements.
So, where do we start? Personally, I like to start by understanding the individual components of my quilt block. Is it made up of squares, rectangles, half square triangles? How many unique shapes of a given size are there? How do the shapes fit together and interact? If you know the answers to these questions, and can understand the size of each unique shape within your block and the relationship between the individual shapes, you can learn to resize your block easily.
For this month’s Quilt Math challenge, we will be using the block illustrated by the figures below. Figure 1 shows a sample block layout with color; figure 2 shows the same block layout without color. (Hint: You can use Figure 2 as a coloring page to try out different color / pattern combinations that may be more pleasing to your design aesthetic.)
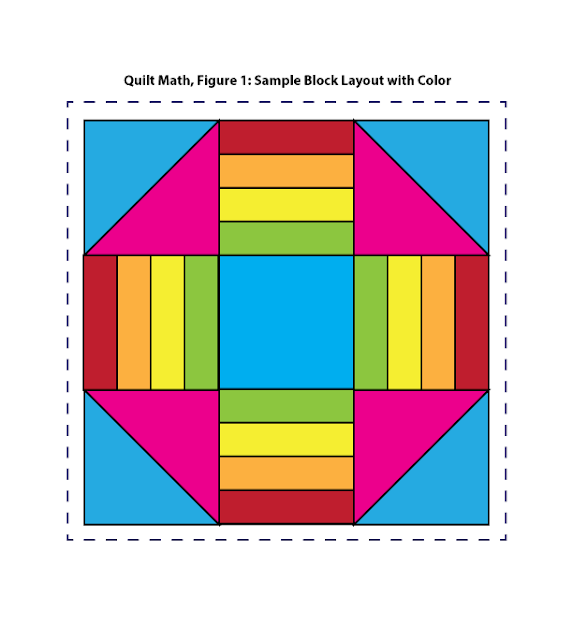

Let’s start with trying to understand the shape and proportion of the sample block. Look back at Figures 1 and 2. Is the overall block square / rectangular? Is it oval / circular? Or is it another shape like a triangle or a hexagon? Also, does the block fit into a general “known” category, like nine-patch, four-patch, double four-patch?
Answer: The sample block for this post is square / rectangular. This is a nine-patch block.
Next, look at the components of the block. Does the block have sub-blocks? If so, how many? How many unique sub-block designs can you identify in Figures 1 and 2? Also, what are the sub-blocks made of? Squares, rectangles, half-square triangles (HST)? All of the above?
Answer: This nine-patch block has three (3) unique sub-block designs. The sub-blocks are a combination of squares, rectangles, and half-square triangles (HST).
Figure 3 (below) highlights the three (3) different sub-blocks. Sub-block A is simply a smaller square. Sub-block B consists of a half-square triangle (HST) set. Sub-block C is made up of 4 rectangles of equal height and the full width of the block.
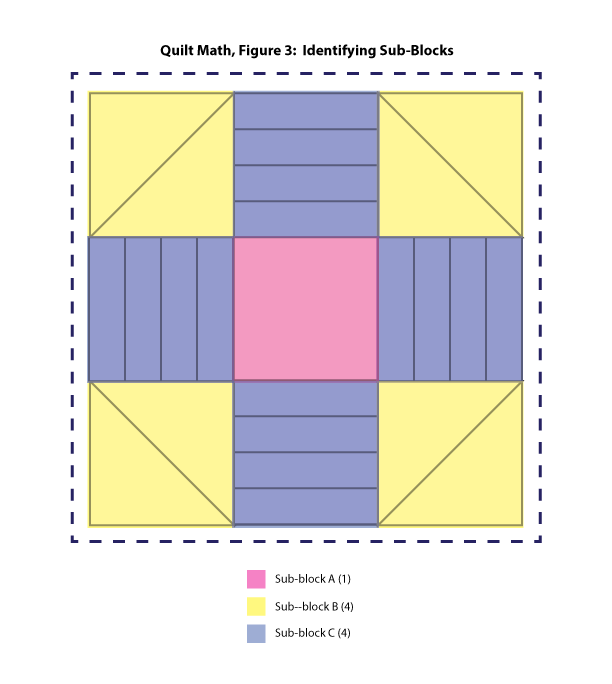
The next thing I like to consider is how the sub-blocks fit together and “interact”. Since we’ve already identified this as a nine-patch block, we know that the block is evenly divided into 9 equal sub-blocks. The sample block contains one (1) sub-block A, four (4) sub-block Bs, and four (4) sub-block Cs.
As for fitting and “interacting” - again, in this case it’s pretty simple to construct once you understand that it is a nine-patch block. When you have your sub-blocks ready, you will sew three sub-blocks into each row and then three rows together to make each main block.
Great -- so now that we understand the shape / fit of the block and its sub-blocks, what next? Well, in order to start cutting any fabric, we need to know the size of the base block. Once we have that information, we can determine the size of each sub-block and its individual components.
The base block (i.e. initial block) measures (shown in Figure 4) 12 inches square (finished) and 12.5 inches square (unfinished). Therefore, each sub-block is 4 inches square (finished) and 4.5 inches square (unfinished).

Let’s look at each of the individual sub-blocks now that we have the size of the base block. Since sub-block A is simply a smaller square, determining the finished and unfinished size of the sub-block is simple. The finished size of sub-block A is 4 inches square and the unfinished size of sub-block A is 4.5 inches square (see figure 5).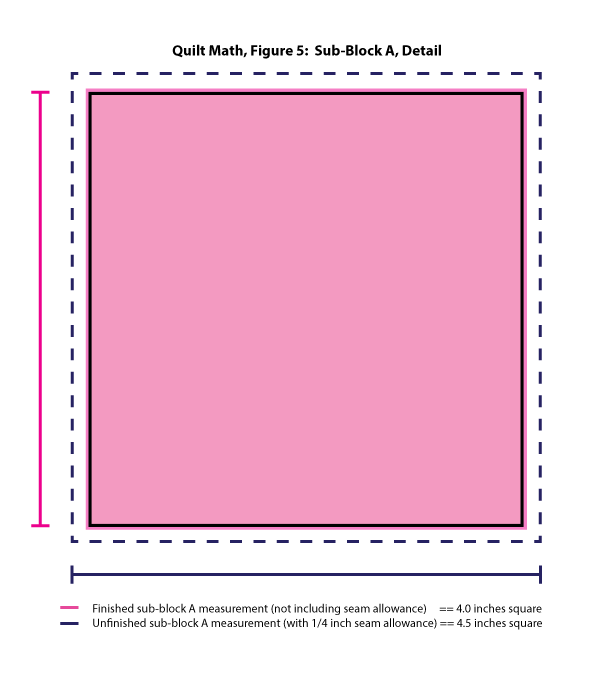
How about sub-block B? Well, we know that overall sub-block B is the same size (finished and unfinished) as sub-block A. But, since sub-block B contains a half square triangle (HST) set, we will need to figure out how big to cut our fabric to create the HST sets. Figure 6 shows the detail for sub-block B, where one HST set is 4 inches square (finished) and 4.5 inches square (unfinished).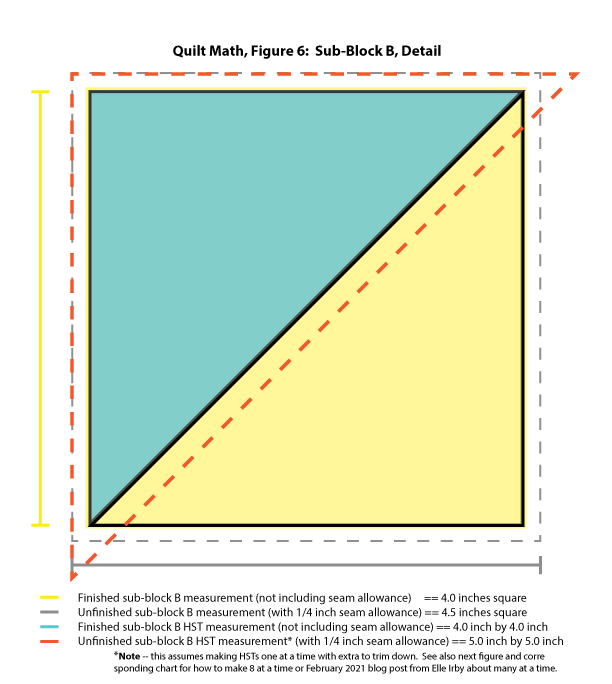
There are a variety of methods to make your HSTs. Typically, I use the 8-at-a-time method. I’ve included calculations and illustrations for how to use that method below (see Figures 7 and 8 below). You can also check out this DCMQG blog post from February 2021 for Elle Irby’s write-up about “many-at-a-time” HSTs.


Now, how about sub-block C? Sub-block C has the same finished and unfinished size as sub-blocks A and B. But what about its individual components? Sub-block C consists of four (4) rectangles that are each ¼ the height of the finished block and the full width of the block (aka stripes!). Figure 9 shows the detail for sub-block C.
So, we’ve identified the unique sub-blocks, we’ve measured the overall block, the sub-block, and the sub-block components. Now what? Well, if you want to resize your block, you should have all the information you need to do so easily.
I’ll walk you through two different examples of how to scale this sample block. In the first example, we will scale the block up (make it larger). In the second example, we will scale the block down (make it smaller). Note: as reference, this google sheet is available with measurement conversions for this block that go from 3 inches square to 114 inches square.
Example 1: Scaling the block up
Let’s say we want to double the outer measurements of the initial block. Instead of 12 inches square (finished) and 12.5 inches square (unfinished), your block is now 24 inches square (finished) and 24.5 inches square (unfinished). How do you start?
Step 1: Start by looking at your “finished” initial block (i.e. without seam allowance). How big is it?
Our original block was 12 inches square.
Step 2: What do you need to do to a 12 inch square to make it 24 inches square?
24 inches / 12 inches == 2
That means that we will be doubling the size of our block (i.e. multiplying everything by 2)
Step 3: Scaling our sub-blocks
Our original sub-block A was 4 inches square (i.e. 4 inches by 4 inches)
Doubling sub-block A: 4 inches * 2 = 8 inches (i.e. 8 inches by 8 inches)
Our original sub-block B was a 4-inch HST set
Doubling sub-block B: 4 inches * 2 == 8 inch HST set
Our original sub-block C was a 4 inch square with 4 rectangular components measuring 1 inch by 4 inches (finished)
Doubling sub-block C; 4 inches * 2 == 8 inch square with 4 rectangular components
1 inch * 2 inches == 2 inches
4 inches * 2 inches == 8 inches
Sub-block C components are now 2 inches by 8 inches (finished)
Step 4: Add seam allowances to individual sub-block components and/or to the sub-block directly.
Sub-block A (with seam allowances) == 8.5 inches square
Sub-block B (with seam allowances) == 8.5 inch square HST set
Using the 8-at-a-time HST method, start with two (2) 18-inch squares (one of each color from the HST set)
Sub-block C (with seam allowances) == 8.5 inch square
4 individual rectangles (with seam allowance) == 2.5 inches x 8.5 inches
Example 2: Scaling the block down
Let’s say we want to halve the outer measurements of the initial block. Instead of 12 inches square (finished) and 12.5 inches square (unfinished), your block is now 6 inches square (finished) and 6.5 inches square (unfinished). How do you start?
Step 1: Start by looking at your “finished” initial block (i.e. without seam allowance). How big is it?
Our original block was 12 inches square.
Step 2: What do you need to do to a 12 inch square to make it 6 inches square?
6 inches / 12 inches == 1/2
That means that we will be halving the size of our block (i.e. dividing everything by 2)
Step 3: Scaling our sub-blocks
Our original sub-block A was 4 inches square (i.e. 4 inches by 4 inches)
Halving sub-block A: 4 inches / 2 = 2 inches (i.e. 2 inches by 2 inches)
Our original sub-block B was a 4-inch HST set
Halving sub-block B: 4 inches / 2 == 2 inch HST set
Our original sub-block C was a 4 inch square with 4 rectangular components measuring 1 inch by 4 inches (finished)
Halving sub-block C; 4 inches / 2 == 2 inch square with 4 rectangular components
1 inch / 2 inches == ½ inch
4 inches / 2 inches == 2 inches
Sub-block C components are now ½ inch by 2 inches (finished)
Step 4: Add seam allowances to individual sub-block components and/or to the sub-block directly.
Sub-block A (with seam allowances) == 2.5 inches square
Sub-block B (with seam allowances) == 2.5 inch square HST set
Using the 8-at-a-time HST method, start with two (2) 6-inch squares (one of each color from the HST set)
Sub-block C (with seam allowances) == 2.5 inch square
4 individual rectangles (with seam allowance) == ½ inches x 2.5 inches
In summary, I find that it is key to always start by understanding the layout of the initial block (i.e. without seam allowance) and any relevant sub-blocks. Once I understand that, and I can document the finished block, sub-block, and sub-block component measurements, I can scale the block to any size I want. Then (and only then!) should you add in the seam allowances. Seam allowances are the last step before cutting your fabric and starting to sew. I hope this post about Quilt Math and the sample block I included have been useful and inspire you to practice scaling quilt blocks up and/or down. The effect of changing the size of the block on the overall design aesthetic can be surprising!
Oh, and before I forget, the most important part of this month’s post -- THE CHALLENGE! I challenge you to take the sample block in this month’s post and resize it to one 36” block OR pick a block of your choosing (see the links below for some additional block ideas) and use the method outlined in this post to scale that block for a charity quilt or a new summer quilt for your deck. How big (or small!) can you go?!
Here are some sites to peruse to select a block to resize:
Quilter’s Cache
Anne Marie’s Block Library
The Spruce Crafts
Quilting Daily
Feel free to reach out with any questions, comments, or suggestions. Happy sewing! Lorraine
Answer: The sample block for this post is square / rectangular. This is a nine-patch block.
Next, look at the components of the block. Does the block have sub-blocks? If so, how many? How many unique sub-block designs can you identify in Figures 1 and 2? Also, what are the sub-blocks made of? Squares, rectangles, half-square triangles (HST)? All of the above?
Answer: This nine-patch block has three (3) unique sub-block designs. The sub-blocks are a combination of squares, rectangles, and half-square triangles (HST).
Figure 3 (below) highlights the three (3) different sub-blocks. Sub-block A is simply a smaller square. Sub-block B consists of a half-square triangle (HST) set. Sub-block C is made up of 4 rectangles of equal height and the full width of the block.
The next thing I like to consider is how the sub-blocks fit together and “interact”. Since we’ve already identified this as a nine-patch block, we know that the block is evenly divided into 9 equal sub-blocks. The sample block contains one (1) sub-block A, four (4) sub-block Bs, and four (4) sub-block Cs.
As for fitting and “interacting” - again, in this case it’s pretty simple to construct once you understand that it is a nine-patch block. When you have your sub-blocks ready, you will sew three sub-blocks into each row and then three rows together to make each main block.
Great -- so now that we understand the shape / fit of the block and its sub-blocks, what next? Well, in order to start cutting any fabric, we need to know the size of the base block. Once we have that information, we can determine the size of each sub-block and its individual components.
The base block (i.e. initial block) measures (shown in Figure 4) 12 inches square (finished) and 12.5 inches square (unfinished). Therefore, each sub-block is 4 inches square (finished) and 4.5 inches square (unfinished).
Let’s look at each of the individual sub-blocks now that we have the size of the base block. Since sub-block A is simply a smaller square, determining the finished and unfinished size of the sub-block is simple. The finished size of sub-block A is 4 inches square and the unfinished size of sub-block A is 4.5 inches square (see figure 5).
How about sub-block B? Well, we know that overall sub-block B is the same size (finished and unfinished) as sub-block A. But, since sub-block B contains a half square triangle (HST) set, we will need to figure out how big to cut our fabric to create the HST sets. Figure 6 shows the detail for sub-block B, where one HST set is 4 inches square (finished) and 4.5 inches square (unfinished).
There are a variety of methods to make your HSTs. Typically, I use the 8-at-a-time method. I’ve included calculations and illustrations for how to use that method below (see Figures 7 and 8 below). You can also check out this DCMQG blog post from February 2021 for Elle Irby’s write-up about “many-at-a-time” HSTs.
Now, how about sub-block C? Sub-block C has the same finished and unfinished size as sub-blocks A and B. But what about its individual components? Sub-block C consists of four (4) rectangles that are each ¼ the height of the finished block and the full width of the block (aka stripes!). Figure 9 shows the detail for sub-block C.
So, we’ve identified the unique sub-blocks, we’ve measured the overall block, the sub-block, and the sub-block components. Now what? Well, if you want to resize your block, you should have all the information you need to do so easily.
I’ll walk you through two different examples of how to scale this sample block. In the first example, we will scale the block up (make it larger). In the second example, we will scale the block down (make it smaller). Note: as reference, this google sheet is available with measurement conversions for this block that go from 3 inches square to 114 inches square.
Example 1: Scaling the block up
Let’s say we want to double the outer measurements of the initial block. Instead of 12 inches square (finished) and 12.5 inches square (unfinished), your block is now 24 inches square (finished) and 24.5 inches square (unfinished). How do you start?
Step 1: Start by looking at your “finished” initial block (i.e. without seam allowance). How big is it?
Our original block was 12 inches square.
Step 2: What do you need to do to a 12 inch square to make it 24 inches square?
24 inches / 12 inches == 2
That means that we will be doubling the size of our block (i.e. multiplying everything by 2)
Step 3: Scaling our sub-blocks
Our original sub-block A was 4 inches square (i.e. 4 inches by 4 inches)
Doubling sub-block A: 4 inches * 2 = 8 inches (i.e. 8 inches by 8 inches)
Our original sub-block B was a 4-inch HST set
Doubling sub-block B: 4 inches * 2 == 8 inch HST set
Our original sub-block C was a 4 inch square with 4 rectangular components measuring 1 inch by 4 inches (finished)
Doubling sub-block C; 4 inches * 2 == 8 inch square with 4 rectangular components
1 inch * 2 inches == 2 inches
4 inches * 2 inches == 8 inches
Sub-block C components are now 2 inches by 8 inches (finished)
Step 4: Add seam allowances to individual sub-block components and/or to the sub-block directly.
Sub-block A (with seam allowances) == 8.5 inches square
Sub-block B (with seam allowances) == 8.5 inch square HST set
Using the 8-at-a-time HST method, start with two (2) 18-inch squares (one of each color from the HST set)
Sub-block C (with seam allowances) == 8.5 inch square
4 individual rectangles (with seam allowance) == 2.5 inches x 8.5 inches
Example 2: Scaling the block down
Let’s say we want to halve the outer measurements of the initial block. Instead of 12 inches square (finished) and 12.5 inches square (unfinished), your block is now 6 inches square (finished) and 6.5 inches square (unfinished). How do you start?
Step 1: Start by looking at your “finished” initial block (i.e. without seam allowance). How big is it?
Our original block was 12 inches square.
Step 2: What do you need to do to a 12 inch square to make it 6 inches square?
6 inches / 12 inches == 1/2
That means that we will be halving the size of our block (i.e. dividing everything by 2)
Step 3: Scaling our sub-blocks
Our original sub-block A was 4 inches square (i.e. 4 inches by 4 inches)
Halving sub-block A: 4 inches / 2 = 2 inches (i.e. 2 inches by 2 inches)
Our original sub-block B was a 4-inch HST set
Halving sub-block B: 4 inches / 2 == 2 inch HST set
Our original sub-block C was a 4 inch square with 4 rectangular components measuring 1 inch by 4 inches (finished)
Halving sub-block C; 4 inches / 2 == 2 inch square with 4 rectangular components
1 inch / 2 inches == ½ inch
4 inches / 2 inches == 2 inches
Sub-block C components are now ½ inch by 2 inches (finished)
Step 4: Add seam allowances to individual sub-block components and/or to the sub-block directly.
Sub-block A (with seam allowances) == 2.5 inches square
Sub-block B (with seam allowances) == 2.5 inch square HST set
Using the 8-at-a-time HST method, start with two (2) 6-inch squares (one of each color from the HST set)
Sub-block C (with seam allowances) == 2.5 inch square
4 individual rectangles (with seam allowance) == ½ inches x 2.5 inches
In summary, I find that it is key to always start by understanding the layout of the initial block (i.e. without seam allowance) and any relevant sub-blocks. Once I understand that, and I can document the finished block, sub-block, and sub-block component measurements, I can scale the block to any size I want. Then (and only then!) should you add in the seam allowances. Seam allowances are the last step before cutting your fabric and starting to sew. I hope this post about Quilt Math and the sample block I included have been useful and inspire you to practice scaling quilt blocks up and/or down. The effect of changing the size of the block on the overall design aesthetic can be surprising!
Oh, and before I forget, the most important part of this month’s post -- THE CHALLENGE! I challenge you to take the sample block in this month’s post and resize it to one 36” block OR pick a block of your choosing (see the links below for some additional block ideas) and use the method outlined in this post to scale that block for a charity quilt or a new summer quilt for your deck. How big (or small!) can you go?!
Here are some sites to peruse to select a block to resize:
Quilter’s Cache
Anne Marie’s Block Library
The Spruce Crafts
Quilting Daily
Feel free to reach out with any questions, comments, or suggestions. Happy sewing! Lorraine